
Side Dishes
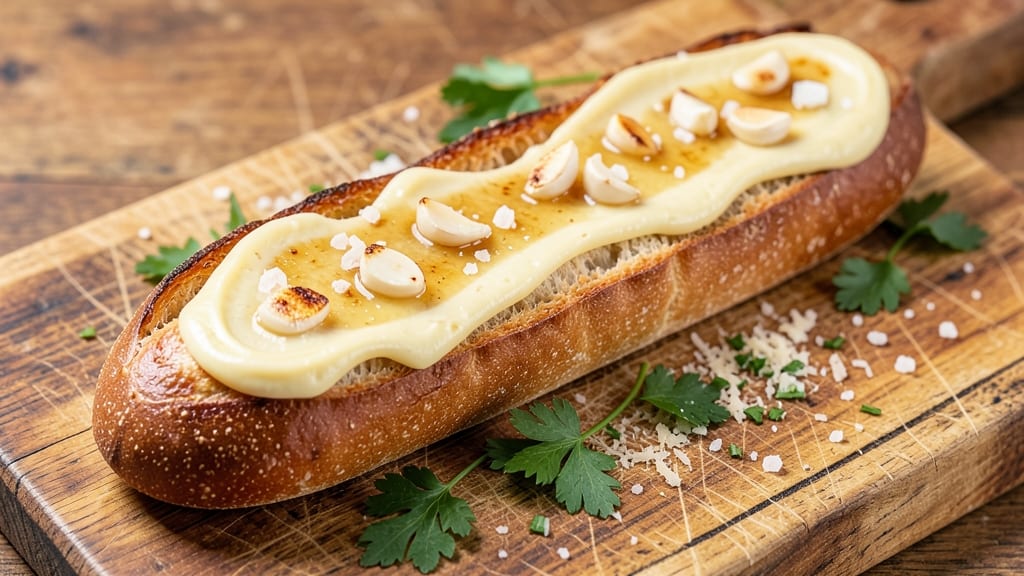
This amazing garlic bread recipe transforms simple bread into knife-tender, golden layers that disappear in seconds. 🔥 The secret? Sautéing fresh garlic in rich butter until fragrant, then spreading it on toasted bread for maximum flavor absorption.
I’ve tested countless versions, and this one delivers that perfect balance of crispy edges and soft, buttery centers—no soggy middle in sight.
What makes this recipe special is the 10-minute prep time, including baking. You’ll need just four core ingredients: a good baguette, quality butter, fresh garlic, and a pinch of salt.
The garlic gets cooked just enough to mellow its sharpness while still packing serious flavor, and the bread toasts first to lock in that perfect texture. No fancy techniques—just simple steps that guarantee restaurant-quality results every time.
By the time it comes out of the oven, your garlic bread will be golden and crispy, with layers so tender they practically melt on your tongue. The aroma alone will have everyone gathered around the table, and the first bite?
That’s when you’ll know it’s worth the wait. This isn’t just side dish—it’s the star of the meal.
Want to take it further? Add a sprinkle of parsley or grated parmesan for extra flair, or swap butter for garlic-infused oil for a lighter twist. Either way, this recipe delivers foolproof perfection that’ll have you making it again and again. Let’s get baking!
Ingredients for amazing garlic bread
Four simple ingredients create knife-tender, golden garlic bread in 10 minutes.
| Ingredient | Amount | Notes |
|---|---|---|
| Baguette 🍞 | 1 whole | Freshly baked or day-old |
| Unsalted Butter 🧈 | ½ cup | Cold, cubed for sautéing |
| Garlic Cloves 🧄 | 6 cloves | Fresh, peeled and sliced thin |
| Kosher Salt 🧂 | ½ tsp | Fine grain preferred |
| Fresh Parsley 🌿 | ¼ cup | Chopped, for garnish (optional) |
| Parmesan Cheese 🧀 | ¼ cup | Freshly grated, for garnish (optional) |
The baguette is everything here—fresh from the bakery or even day-old works best. I grab mine from Trader Joe's or my local French bakery if I'm feeling fancy. The butter? European-style if you can find it—it has more flavor and a lower melting point. For garlic, more is better—just don’t burn it. If you’re using pre-sliced garlic from a jar, skip it. Fresh is non-negotiable for that rich, fragrant flavor that makes this dish amazing.
No butter? Olive oil or garlic-infused oil works in a pinch, but the texture won’t be quite the same. Short on parsley? Dried parsley at half the amount or a sprinkle of dried oregano gets you close. The Parmesan is totally optional, but if you’ve got it, freshly grated from a wedge makes all the difference. Pre-grated tastes like sawdust. For a lighter twist, swap half the butter for garlic-infused olive oil—still delicious, just a bit healthier.
This bread reheats beautifully—just pop slices in the oven for 2-3 minutes at 350°F. Store leftovers in an airtight container for 2 days at room temperature or 3 days in the fridge. Freeze slices wrapped in foil for up to 1 month. Pro tip: Double the recipe and freeze half for lazy weeknights. It’s the ultimate make-ahead side dish.
Why You'll Love This Recipe
- The secret’s in the timing: toast until the crust is golden and the butter’s bubbling. That crispy edge with the creamy, garlicky center? My kids fight over the last piece—no joke.
- Five-Ingredient Magic: The pantry already has everything—no last-minute grocery runs. Slice the baguette, melt the butter with garlic, and brush it on. That’s it. Honestly, I’ve made this while waiting for pasta water to boil.
- Butter-Garlic Crunch: The secret’s in the timing: toast until the crust is golden and the butter’s bubbling. That crispy edge with the creamy, garlicky center? My kids fight over the last piece—no joke.
- Weeknight Workhorse: Dinner guests? Movie night? Leftovers? This works for all of it. I keep a loaf in the freezer for lazy days, and it reheats like it was just baked. (Yes, even on a Tuesday night.)
Step-by-step instructions for buttery knife-tender garlic bread
Here's how to transform a simple baguette into restaurant-quality garlic bread with crispy, buttery layers.
🔪 Step 1: Slice the Baguette Lengthwise
Place the 1 whole baguette on a cutting board and slice it lengthwise down the center, stopping about ½ inch from the bottom. This creates two long halves that will open like a book, allowing the butter to soak in deeply. For even more dramatic results, you can make two cuts instead of one, creating three sections—but the classic two-cut method works perfectly.
Here's the thing—don't press down too hard with your knife or you'll crush the bread. I like to use a serrated knife for this because it gives me cleaner cuts without tearing the crust. Once sliced, gently pull the halves apart to create an even channel for the butter mixture. The bread should open like a book, revealing the soft interior ready for transformation.
🍳 Step 2: Melt the Butter and Infuse with Garlic
In a small saucepan, melt the ½ cup unsalted butter over medium-low heat until it's completely liquid but not browned. Remove from heat and add the 6 cloves sliced garlic cloves and ½ teaspoon kosher salt. Let the mixture sit for 5 minutes—this allows the garlic to infuse the butter with maximum flavor without burning.
I know it seems like a short time, but trust me—this step makes all the difference. The garlic should smell intensely aromatic by the end, and the butter should take on a beautiful golden hue. If you're using a freshly baked baguette, the residual heat from the butter will help maintain its crispiness while the interior softens just enough to become tender.
🥘 Step 3: Assemble and Bake for Perfect Texture
Preheat your oven to 375°F. Place the sliced baguette halves on a baking sheet lined with parchment paper, opening them like a book to create a channel. Using a spoon or small ladle, carefully pour the garlic butter mixture over the baguette, making sure to saturate both halves completely. The butter should pool in the center and run down slightly—this ensures every bite gets that buttery, garlicky goodness.
Bake for 8-10 minutes until the edges are golden brown and the bread is heated through. You'll know it's perfect when the crust is crispy and the interior is knife-tender—meaning a butter knife should slide in easily without resistance. If you're feeling fancy, sprinkle the ¼ cup freshly grated parmesan cheese and ¼ cup chopped fresh parsley on top right before serving for extra flavor and presentation.
⏰ Step 4: Rest and Serve Immediately
Remove the garlic bread from the oven and let it rest for 2-3 minutes. This brief resting period allows the butter to redistribute and the bread to firm up slightly, making it easier to handle and serve. The bread should be hot, crispy on the outside, and soft and buttery on the inside—each slice should pull apart with a gentle tug, revealing those tender layers.
Slice into ½-inch thick pieces and serve immediately while still warm. The contrast between the crispy crust and the soft, buttery interior is what makes this garlic bread truly amazing. Pair it with marinara sauce for dipping, or serve alongside your favorite pasta dish for the ultimate comfort food experience.
Pro Tips For Making Amazing Garlic Bread
- TOAST THE GARLIC FIRST: I used to just mince the garlic raw and toss it in—big mistake. Heat a dry pan over medium and toast the minced garlic for 30 seconds until it smells nutty and fragrant. This removes that sharp bite and deepens the flavor. (Yes, even if you're impatient like me, wait for it.)
- SLICE THE BAGUETTE LENGTHWISE: Cutting the baguette in half lengthwise gives you way more surface area for the butter to cling to. Skip the crosswise slices unless you want a sad, under-buttered middle. A sharp serrated knife makes this easier—no need to wrestle with a dull blade.
- DON’T OVERLOAD THE BUTTER: Two tablespoons of softened unsalted butter is plenty for a standard baguette. Too much butter means soggy bread, not crispy. Spread it evenly, then sprinkle with salt and parsley—this keeps the texture light and the flavors balanced.
- LET IT REST AFTER TOASTING: After baking, give the garlic bread a solid 5-10 minutes under foil before serving. This lets the butter set slightly, so it doesn’t turn into a greasy mess when you slice it. (Your future self will thank you.)
Essential equipment for this dish
Baking Sheet Essentials
Start with a sturdy half-sheet baking pan (about 13x18 inches) lined with parchment paper—this prevents sticking and makes cleanup a breeze. I swear by Kirkland Signature parchment from Costco because it’s thick enough to handle the butter without tearing.
For extra crispiness, place the pan on the middle rack of your oven where heat circulates evenly. 🔥
Butter Melting Tools
Use a small saucepan (about 1-quart capacity) for melting the butter—it gives you better control over the heat. I prefer Calphalon stainless steel because it heats evenly and won’t scorch the garlic.
For a hands-off approach, a microwave-safe bowl works in a pinch: melt the butter in 30-second intervals until fully liquid, stirring between each interval.
Garlic Slicing Knife
A sharp chef’s knife (like Victorinox 8-inch) is your best friend for slicing garlic. Thin, even slices infuse the butter faster and prevent burning. Pro tip: Smash the garlic cloves with the flat side of your knife before slicing—this releases more flavor.
If you’re short on time, a garlic press works, but it releases moisture that can make the butter watery.
Oven Thermometer
Ovens run hot or cold, so grab an instant-read oven thermometer (I use Thermoworks Oven Thermometer) to confirm your oven hits 375°F. A 5-10°F difference can mean the difference between perfect golden bread and dry, overcooked crust.
Place it near the rack where your baking sheet will sit for the most accurate reading.
Serving Tools
Serve with a long, thin knife (like a slicing knife for baguettes) to cut clean, even slices. A wooden serving board keeps the bread warm and adds rustic charm.
For extra flair, use a small ladle to drizzle any leftover garlic butter over the top before serving—it’s the perfect finishing touch. 💫
Optional Extras
For garnishing, keep fresh parsley and Parmesan cheese on hand—both elevate the dish. A microplane is ideal for grating cheese quickly, but a box grater works too. If you’re feeling fancy, a small offset spatula helps spread any extra butter mixture evenly before baking.
These tools aren’t mandatory, but they make the process smoother and the results even more impressive.
Nutrition facts
Frequently asked questions
Can I use day-old bread for this recipe?
Yes! Day-old baguettes actually work better because they're slightly drier and hold up better to the butter without getting soggy. Fresh bread can make the crust too soft. If you must use fresh bread, toast it lightly in the oven for 2-3 minutes at 350°F before adding the garlic butter to prevent a gummy texture.
What if I don't have fresh parsley or parmesan?
No problem! Skip them or substitute with dried parsley (half the amount) or a pinch of dried oregano for parsley. For parmesan, try grated asiago or even a sprinkle of crushed red pepper flakes for a spicy kick. The garlic butter will still taste amazing on its own—those toppings are just for extra flair.
How do I fix garlic bread that's too dry?
If your garlic bread turns out dry, it likely didn't get enough butter or was overbaked. Next time, use 1/3 cup more butter and bake for just 7-8 minutes. For immediate fixes, brush warm slices with melted butter and broil for 1-2 minutes until golden. The key is keeping the oven temperature at 375°F—any hotter and the bread dries out faster.
Can I make this recipe without butter?
For a lighter version, melt 1/3 cup olive oil with the garlic and salt, then proceed as directed. For extra richness, mix 2 tablespoons butter with 1/4 cup olive oil. The texture will be slightly different but still delicious. If you're avoiding dairy, garlic-infused oil works beautifully—just infuse it by simmering 6 garlic cloves in 1/3 cup olive oil for 5 minutes before using.
Why did my garlic bread get soggy in the middle?
Soggy garlic bread usually happens when the butter pools too much in the center or the bread wasn't toasted enough first. To prevent this, spread the garlic butter mixture evenly with a spoon, and