
Side Dishes
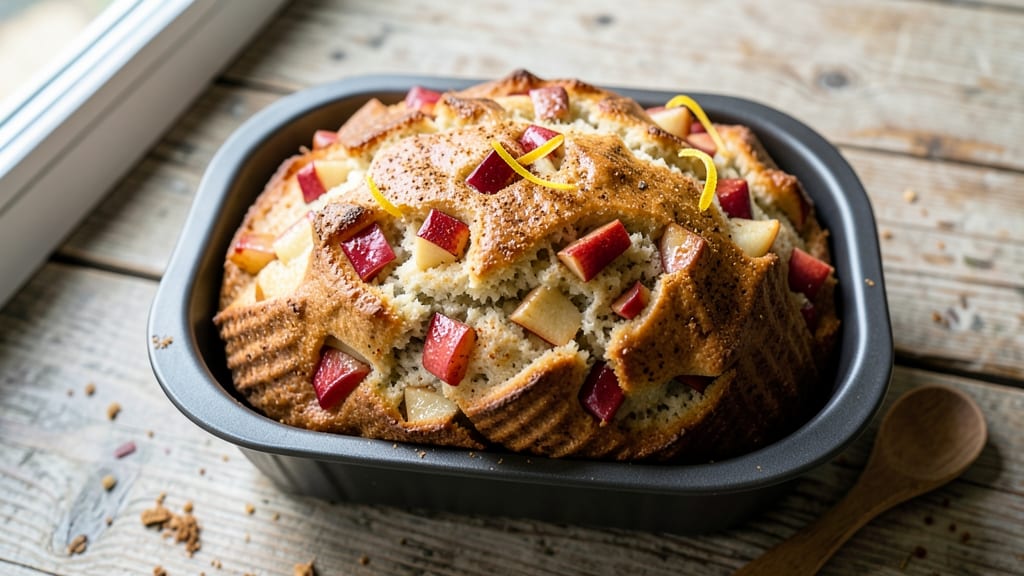
This apple spice bread machine recipe transforms simple ingredients into a warm, cinnamon-kissed loaf with tender apple swirls—all with minimal effort. The bread machine handles the kneading and baking, so you only need to prep the dough and add-ins.
I’ve perfected this recipe over years of testing, ensuring the apples stay juicy and the crust remains golden and fragrant.
The secret lies in the hydration ratio and timing—using slightly more flour than liquid creates a tender crumb, while the apples release their natural sweetness during baking. You’ll start with a basic bread machine cycle, then add the apple-cinnamon filling in the final minutes for perfect swirls.
This recipe works with any bread machine model, though I recommend using the "Dough" setting first to avoid overmixing.
What you’ll end up with is a homemade loaf that smells like autumn—warm, spiced, and slightly sweet from the caramelized apples. The texture is soft yet sturdy, with a crisp crust that’s perfect for slicing.
It’s ideal for breakfast, snacking, or gifting, and the leftovers reheat beautifully. No yeast headaches or messy kneading—just set it and forget it.
For extra flavor, try adding dried cranberries or a pinch of nutmeg to the filling. The recipe scales easily, so you can make two loaves for a crowd. Let’s get started—your bread machine is about to become your new best friend.
Ingredients for apple spice bread machine
Pantry staples plus apples and spices—your bread machine does the rest.
| Ingredient | Amount | Notes |
|---|---|---|
| All-Purpose Flour 🌾 | 4 cups | Sifted for even texture |
| Granulated Sugar 🍚 | ½ cup | White or brown for depth |
| Active Dry Yeast 🍞 | 2 ¼ tsp | Ensure freshness (test in warm water) |
| Unsalted Butter 🧈 | ½ cup | Softened to room temperature |
| Milk 🥛 | 1 ¼ cups | Warm for yeast activation |
| Large Egg 🥚 | 1 whole | Room temperature for even mixing |
| Ground Cinnamon 🌶️ | 1 ½ tbsp | Freshly ground for best flavor |
| Ground Nutmeg 🌿 | ½ tsp | Freshly grated preferred |
| Salt 🧂 | 1 tsp | Kosher or sea salt preferred |
| Apples 🍎 | 2 medium | Peeled, cored, finely diced (Honeycrisp or Fuji) |
| Brown Sugar 🍚 | ¼ cup | Packed for filling sweetness |
| Dried Cranberries 🍇 | ¼ cup | Optional for extra tartness |
The apples are everything here. Honeycrisp or Fuji stay juicy without turning mushy—avoid Granny Smith unless you want tartness. Grab a couple from the produce section (they keep well for a week in the fridge). For the flour, King Arthur or Bob’s Red Mill are my go-tos—they’re reliable for bread machine recipes. The yeast? Freshness matters—if it’s past its expiration, toss it. And don’t skip the warm milk—it activates the yeast faster than cold milk ever could.
No brown sugar? White sugar plus a pinch of molasses works in a pinch. Short on apples? Substitute with 1 cup of diced pear—it’s sweeter, so reduce the brown sugar slightly. The dried cranberries are optional but add that perfect autumnal bite. Trader Joe’s or Costco usually have good prices on them. For the spices, Penzeys or bulk bins are your friends—ground spices lose potency fast. If you’re feeling fancy, add a pinch of cardamom to the filling for a sophisticated twist.
This dough keeps for 24 hours in the fridge if you want to prep ahead—just let it sit at room temp for 10 minutes before adding to the bread machine. The baked loaf? 3 days at room temp in a bread bag, or freeze for up to 3 months. I love making two loaves—one for the freezer, one for the table. Slice it fresh, and the apples stay juicy and the crust stays crisp. Perfect for breakfast or gifting!
Why You'll Love This Recipe
- Warm Spice Hug: That buttery, cinnamon-kissed dough with tender apples? It’s the kind of bread that smells like autumn in your kitchen and tastes like a cozy hug. The sugar caramelizes just enough to make every slice feel special.
- Breakfast to Brunch: Slice it thick for French toast, toast it for a quick snack, or pack it for lunch—this bread adapts to any time of day. (Yes, even on a Tuesday night when you’re too tired to think.)
- Budget-Friendly Staple: A loaf costs pennies to make, keeps for days, and never goes to waste. Between us, I’ve revived stale slices by toasting them with extra butter—no one will guess they’re not fresh.
Step-by-step instructions for apple spice bread machine recipe
This bread machine magic transforms simple ingredients into fragrant, swirled perfection with minimal effort.
Prepare the Apple Filling
Start by peeling and coring the 2 medium apples, then finely dice them into small, even pieces. I like to use Honeycrisp or Fuji—they hold their shape and add just the right amount of moisture to the filling. In a small bowl, combine the diced apples with 0.25 cup packed brown sugar, 1.5 tablespoons ground cinnamon, 0.5 teaspoons ground nutmeg, and 0.25 cup dried cranberries. Mix well until the apples are evenly coated, then set aside.
This is where the magic happens—the spices and sweetness will caramelize beautifully during baking, creating pockets of warm, spiced apple goodness throughout your loaf. If you're feeling fancy, you can toss in a pinch of salt to balance the sweetness, but it's not necessary with the cranberries already adding tartness.
Mix the Dough in the Bread Machine Pan
In the bread machine pan, combine 4 cups all-purpose flour, 0.5 cup granulated sugar, 2.25 teaspoons active dry yeast, 1 teaspoon salt, and 0.5 cup softened unsalted butter. Use your fingers or a wooden spoon to mix these dry ingredients together until the butter is evenly distributed and the mixture looks crumbly.
Next, add 1.25 cups warm milk (about 110°F—warm to the touch but not hot) and 1 whole large egg. Mix everything together until you have a shaggy dough that comes together when pressed. The dough should be sticky but not wet—if it's too dry, add a teaspoon of milk at a time until it reaches the right consistency. This step ensures your bread will rise properly and develop a tender crumb.
Create the Swirl and Set the Bread Machine
Once the dough is mixed, press it down gently in the pan to create an even layer. Using your fingers or a spoon, create a well in the center of the dough about 2 inches wide. Spoon the prepared apple filling into this well, then carefully swirl it into the dough using a spatula or your fingers. The goal is to distribute the filling evenly throughout the dough without tearing it.
This is the moment that matters: the swirl should look like a loose, uneven rope of dough with filling peeking through. If the dough feels too sticky to handle, wet your fingers slightly to help it glide. Once you're happy with the swirl, cover the pan loosely with a clean kitchen towel and let it rest for 10 minutes at room temperature. This brief rest helps the dough relax and makes shaping easier.
Select the Basic Bread Setting and Bake
After the dough has rested, place the pan into your bread machine and select the Basic Bread setting. Choose the 4-pound loaf size if your machine offers this option, or the standard setting if it doesn't. The machine will automatically go through the kneading, rising, and baking cycles—usually taking about 3 to 3.5 hours total, depending on your specific model.
During the baking cycle, you'll be treated to the most incredible aroma wafting through your kitchen. That's the smell of warm apples, cinnamon, and nutmeg mingling with freshly baked bread—trust me, it's worth the wait. The bread is done when it's golden brown on top and the internal temperature reaches 190°F. If your machine has a window, you'll see the loaf pull away from the sides of the pan as it bakes.
Cool and Slice for Maximum Enjoyment
Once the bread machine beeps to signal it's done, remove the loaf from the pan and place it on a wire rack to cool for at least 30 minutes. This cooling step is crucial—it allows the bread to set properly and prevents the filling from oozing out when you slice it. If you can resist, wait the full 30 minutes before cutting into your creation.
When you're ready to serve, slice the bread into thick pieces to showcase the beautiful swirls of spiced apple filling. The bread should have a tender, slightly dense crumb with pockets of caramelized apple and cranberry throughout. Serve it warm with a pat of butter or a smear of cream cheese for the ultimate cozy treat. This bread is best enjoyed fresh, but you can store leftovers in an airtight container at room temperature for up to 2 days or freeze for up to 3 months.
Pro Tips For Making Apple Spice Bread Machine
- WARM THE MILK FIRST: Cold milk kills yeast faster than you’d think—especially in a bread machine where temperatures fluctuate. Heat it to about 110°F (just warm to the touch, like a baby bath) before mixing with yeast and sugar. I learned this the hard way when my dough took three extra hours to rise because the yeast was basically hibernating.
- MELT THE BUTTER SLIGHTLY: Softened butter works, but slightly melted (not greasy) butter blends more evenly into the dough and creates a richer crumb. Microwave it in 5-second bursts until it’s just fluid enough to coat the spoon—this ensures it distributes without turning the dough greasy. (Yes, even if you’re impatient like me.)
- DON’T OVERLOAD THE APPLES: The recipe might call for chopped apples, but too many make the dough dense and gummy. Stick to 1 cup max (or about 2 small apples), and toss them in 1 tbsp flour first to absorb moisture. I skipped this once and ended up with a brick instead of bread—trust me, it’s not worth it.
- USE A LIGHT HAND WITH SUGAR: Granulated sugar is non-negotiable here, but pack it loosely—tamping it down compresses the dough and throws off the rise. Scoop it straight from the bag into the measuring cup, then level it off. My grandmother swore by this, and she was right: the bread turns out lighter and more tender when the sugar is fluffy, not packed.
Common mistakes when making this dish
Overmixing the Dough
Your bread machine does the kneading for you, but if you mix the dough too vigorously by hand before adding it to the pan, you’ll end up with a tough, dense loaf. The dough should be shaggy and sticky—not a smooth, elastic ball.
Once it’s in the machine, let it handle the kneading cycle without your interference. Overmixing develops too much gluten, which makes the bread chewy instead of tender. 💡
Skipping the Rest Time
The 10-minute rest after shaping the dough is crucial for two reasons: it lets the dough relax so it’s easier to handle, and it helps the filling distribute more evenly during baking.
If you rush this step, the filling may not swirl properly, leading to uneven pockets of apple and spice. Trust me, those extra minutes prevent a messy loaf later.
Using Cold Ingredients
Cold butter, milk, or eggs can shock the yeast and slow down fermentation, resulting in a flat loaf. Always use room-temperature butter and warm milk (110°F) to activate the yeast properly. A quick fix?
Place the milk in a microwave-safe bowl with the egg for 20-30 seconds until just warm to the touch. Cold ingredients are a common rookie mistake that ruins the rise.
Overloading the Filling
Too much filling can weigh down the dough, preventing proper rising. Stick to the 2 apples + 0.25 cup brown sugar ratio—any more and the bread may collapse or have a gummy texture.
The filling should feel like a light, even layer when swirled into the dough. If you’re tempted to double the apples, reduce the sugar by half to balance the moisture.
Ignoring the Cooling Phase
Cutting into the bread too soon is a cardinal sin. The filling needs time to set, or it’ll ooze out like a gooey mess when you slice. Let the loaf cool on a wire rack for at least 30 minutes—patience here ensures clean slices with visible swirls.
Pro tip: If you’re eager, wait 1 hour for the best texture and presentation. 🍞
Wrong Bread Machine Setting
Not all bread machine settings are created equal. For this recipe, the Basic Bread setting (not Dough or Quick Bread) is key—it ensures proper kneading and rising time. If you accidentally select the Dough setting, the bread won’t bake fully.
Double-check your machine’s manual if you’re unsure, and always opt for the 4-pound loaf size if available for the best texture.
Nutrition facts
Frequently asked questions
Can I make this recipe without a bread machine?
Yes! You can adapt this to a traditional method by mixing the dough by hand, letting it rise twice, then shaping and swirling the filling before baking in a 350°F oven for 40-45 minutes. The texture will be slightly denser, but still delicious. Use the same ingredients and ratios, just knead for 5-7 minutes by hand until smooth.
What if my bread machine doesn't have a \"Basic Bread\" setting?
Most machines have a standard \"White Bread\" or \"Basic\" setting that works perfectly. If yours only offers \"Dough\" mode, select that first to mix the dough, then transfer it to a greased loaf pan, add the filling, and bake at 350°F for 30-35 minutes until golden. The texture may differ slightly but still taste amazing!
How do I store leftovers to keep them fresh?
Wrap cooled slices in plastic wrap or store in an airtight container at room temperature for up to 2 days. For longer storage, freeze slices on a tray first (to prevent sticking), then transfer to a freezer bag for up to 3 months. Reheat in a toaster or microwave for 10-15 seconds to restore freshness.
Can I substitute dried fruit for fresh apples?
Use 1 cup chopped dried apples (like apple chips) instead of fresh, but reduce the brown sugar to 0.125 cup since dried fruit is sweeter. Soak the dried apples in warm water for 10 minutes first to rehydrate them—this prevents a dry, crumbly texture in your loaf.
Why did my bread turn out dense instead of fluffy?
Dense bread usually means overmixing (too much gluten development) or cold ingredients slowing yeast activity. For next time, mix just until combined, use warm milk (110°F), and ensure your yeast is fresh. Also verify your bread machine's weight setting—some machines need the 4-pound option for proper texture.