
Side Dishes
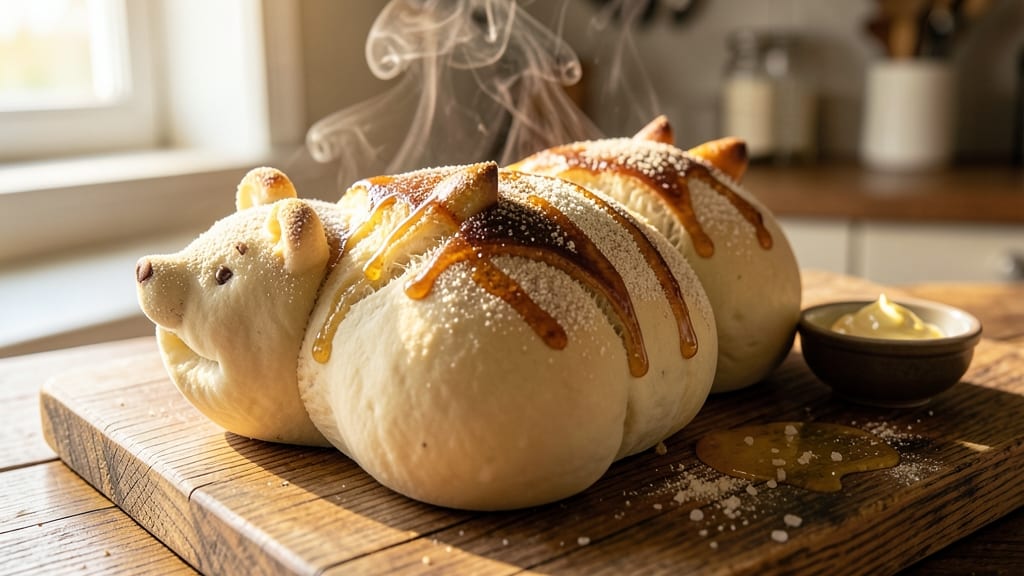
Transforming simple bread dough into this adorable animal-shaped bread recipe turns an ordinary side dish into a showstopper that delights both kids and adults. 🌟 This recipe takes basic ingredients and a little creativity to create whimsical bites that look as good as they taste—perfect for birthdays, holidays, or just because.
The secret lies in using a soft, pliable dough that holds its shape during baking while staying tender inside.
What makes this recipe special is its beginner-friendly approach—no advanced techniques required. You'll work with a straightforward dough recipe that's easy to shape, proof, and bake into recognizable animals like bunnies, pigs, or dogs.
The key is rolling the dough evenly and using simple tools (or even your hands) to create playful details without stress. With just a few extra minutes of shaping, you'll elevate a simple loaf into something magical.
By the time these little loaves emerge from the oven, you'll have golden, crisp-edged animal shapes with soft, pillowy interiors—ideal for serving warm with butter or a light glaze. The aroma alone will have everyone gathering around the table, and the visual appeal makes it a hit at any gathering.
Whether you're celebrating a special occasion or just want to bring joy to your kitchen, these animal-shaped breads are sure to impress.
For added fun, consider using colored glazes or edible decorations to enhance the animal designs. This recipe scales easily, so you can make a few for a small gathering or a whole tray for a crowd. Let's get started on creating these charming, edible masterpieces!
Ingredients for animal shaped bread
Pantry staples plus a few playful extras—turning ordinary dough into magical animal shapes.
| Ingredient | Amount | Notes |
|---|---|---|
| All-Purpose Flour 🌾 | 4 cups | Sifted for light texture |
| Active Dry Yeast 🍞 | 2 ¼ tsp | One packet for convenience |
| Granulated Sugar 🍚 | 1 tbsp | For yeast activation |
| Unsalted Butter 🧈 | ¼ cup | Cold, cubed for easier mixing |
| Large Eggs 🥚 | 2 whole | Room temperature for smooth dough |
| Warm Water 💧 | 1 ¼ cups | 110°F for yeast activation |
| Salt 🧂 | 1 tsp | Kosher or sea salt |
| Milk 🥛 | ¼ cup | Warmed for tender dough |
| Egg Wash 🥚 | 1 whole | 1 large egg beaten |
| Cornmeal 🌽 | ½ cup | For dusting work surface |
| Egg Yolk 🥚 | 1 whole | For optional glaze |
| Honey 🍯 | 1 tbsp | For optional glaze |
| Food Coloring 🎨 | 1 tsp | Optional for animal details |
Flour is the foundation here, so grab King Arthur or Gold Medal if you can—both give that perfect balance of structure and tenderness. Yeast loses potency fast, so check the date on that packet (it should smell fresh, not stale). For the butter, Land O'Lakes or Plugrá work great, but any unsalted brand will do. The milk should be warm to the touch—just enough to melt the butter but not so hot it kills the yeast. Pro tip: Keep your ingredients at room temperature for about 30 minutes before mixing—this makes the dough way easier to handle.
No egg wash? A splash of milk mixed with a pinch of salt works in a pinch (though it won't give that gorgeous golden sheen). Running short on cornmeal? Semolina or even more flour will work for dusting, but cornmeal gives that classic texture. For the glaze, skip the honey if you're avoiding sugar—maple syrup or agave works just as well. The food coloring? Wilton or Americolor are the brands I always grab—they're vibrant and easy to find at any grocery store. And if you're feeling fancy, grab a piping bag with a small tip for adding details like ears or spots to your animal shapes.
This dough keeps for 2 days in the fridge, wrapped tightly in plastic. For longer storage, freeze shaped dough balls (unbaked) for up to 3 months—just let them thaw at room temp before baking. The egg wash can be prepped ahead and stored in the fridge for 1 day. Pro move: Shape your animals the night before and let them proof overnight in the fridge for even more flavor. And if you're making these for a crowd, double the recipe—they disappear fast!
Why You'll Love This Recipe
- Kid-Proof Fun: I’ll admit—rolling dough into animal shapes with my 6-year-old is messy, but the butter-kneaded dough is so forgiving. No sharp tools needed; just a rolling pin and their wildest imagination (and maybe a few lopsided bunnies).
- Golden Crust Magic: That crispy, buttery crust? It’s the star. The sugar in the dough caramelizes just enough when baked, giving it this addictive contrast—soft inside, crackly out. Honestly, I’ve caught myself sneaking slices when no one’s looking.
- Party in a Loaf: Between us, this bread is my go-to for kids’ birthdays or holiday gatherings. Shape them into dinosaurs for a theme party or little pigs for Easter—it’s the kind of thing that makes guests smile before they even taste it. (And yes, the adults eat them too.)
- Pantry Staple Power: You’re already using flour, yeast, and eggs for half your recipes? Perfect. This dough keeps for days in the fridge, and leftovers toast up like fresh-baked magic. I’ve fed a crowd of 10 with one batch—just multiply the shapes. Budget-friendly and impressive? That’s my kind of win.
Step-by-step instructions for animal shaped bread
Let's make this dough fun—whimsical shapes start with the right texture.
👨🍳 Step 1: Mix the Dough with Warm Ingredients
In a large mixing bowl, combine the 4 cups all-purpose flour, 2.25 tsp active dry yeast, 1 tbsp granulated sugar, and 1 tsp salt. Whisk everything together until the flour is aerated and the yeast is evenly distributed. This creates a perfect foundation for light, fluffy bread.
In a separate small bowl, melt the ¼ cup unsalted butter in the microwave for 15-20 seconds (just until it's soft but not liquid). Let it cool slightly, then add the 2 whole large eggs, 1.25 cups warm water (about 110°F—warm to the touch but not hot), and ¼ cup warm milk to the melted butter. Mix until smooth.
Pour the wet ingredients into the dry ingredients and stir with a wooden spoon until a shaggy dough forms. The dough should pull away from the sides of the bowl but still be slightly sticky—that's exactly what we want. If it feels too dry, add 1 tsp warm water at a time until it reaches the right consistency.
🍳 Step 2: Knead Until Silky and Elastic
Turn the dough onto a lightly floured surface and knead for 8-10 minutes by hand, or use a stand mixer with a dough hook attachment on medium speed for 5-6 minutes. You're looking for a smooth, elastic dough that springs back when poked—this means the gluten has developed properly, which is key for holding those fun animal shapes.
If the dough feels too sticky, add 1 tbsp flour at a time while kneading. If it's too dry, add 1 tsp warm water and knead again. The dough should feel like a soft, slightly tacky ball—not crumbly, not sticky. Real talk: this is where the magic happens, so don't rush it.
Once the dough is perfect, place it back in the bowl, cover with a damp towel, and let it rise in a warm spot for 1-1.5 hours or until it has doubled in size. You'll know it's ready when you poke it gently and the indentation stays put—that's the perfect rise for shaping.
🥘 Step 3: Shape and Prepare for the Fun Part
Punch down the risen dough to release the air, then divide it into 12 equal portions (about 3 oz each). Roll each portion into a smooth ball, then flatten slightly with your palm. This is where the creativity begins—use cookie cutters or your hands to shape the dough into animals. Think bunnies, dinosaurs, or even simple ovals for sandwiches.
Place the shaped dough on a baking sheet lined with parchment paper and dusted with ½ cup cornmeal. This keeps them from sticking and gives a nice texture. If you're using 1 tsp food coloring for fun details, use a toothpick to draw eyes or spots on the shapes before baking.
Cover the baking sheet loosely with a towel and let the dough rise again for 30-45 minutes until slightly puffy. This second rise ensures your animal shapes hold their form in the oven. Preheat your oven to 375°F while the dough rises—this is the sweet spot for golden, crisp edges.
🔥 Step 4: Bake to Golden Perfection
Brush the risen animal shapes with the 1 whole egg wash (beaten egg) for a shiny finish. For extra sparkle, mix 1 tbsp honey with 1 whole egg yolk and brush this glaze over the shapes after baking—it adds a beautiful sheen and subtle sweetness.
Bake the animal bread for 12-15 minutes until they're golden brown and sound hollow when tapped on the bottom. Rotate the baking sheet halfway through for even browning. If you're making them for kids, let them cool for 5 minutes before serving—warm bread is perfect for little hands, but it's safer once cooled slightly.
Here's the thing—these shapes are best served fresh. The crust stays crispy for about 2 hours, but the inside stays soft and pillowy. Store any leftovers in an airtight container at room temperature for up to 2 days, or freeze for up to 1 month. Just reheat in a 350°F oven for 5-10 minutes to restore that fresh-baked goodness.
Pro Tips For Making Animal Shaped Bread
- MEASURE FLOUR BY WEIGHT: I learned this the hard way—volumetric measuring with all-purpose flour leads to inconsistent dough. Use a kitchen scale for the flour (350g for most recipes) to guarantee the right hydration and rise. That extra 20g of loose flour in your cup makes a noticeable difference in how the dough behaves when shaping animals.
- SOFTEN BUTTER BEFORE MIXING: Cold butter creates lumps that won’t incorporate smoothly into the dough. Microwave it in 10-second bursts until just pliable (about 30 seconds total), then let it sit for 30 seconds to even out the temperature. Warm butter blends better and gives that signature tender crumb without greasing the dough excessively.
- LET THE DOUGH REST AFTER SHAPING: Skipping the final proof (30-60 minutes at room temp) is the fastest way to flat, sad animal shapes. Cover the shaped dough loosely with a towel and let it relax—this helps the gluten relax so your bunny ears or lion mane won’t collapse when baking. (Yes, even if you’re impatient like me.)
- BRUSH EGGS WITH WATER FIRST: Instead of slathering raw egg wash directly on shaped dough, lightly brush the animals with water first. This helps the egg adhere better and prevents cracking when you add details like ears or tails. Use a pastry brush and go light—you only need enough to create a sticky surface.
Troubleshooting perfect results
Dough Too Sticky?
If your dough feels overly sticky during kneading, don't panic—this is fixable! Gradually add 1 tbsp flour at a time while kneading until the dough pulls away from your hands but still feels slightly tacky.
Over-kneading can make it tough, so aim for 8-10 minutes max by hand. For extra insurance, chill the dough for 15 minutes in the fridge before shaping—this firms it up without drying it out.
Shapes Collapsing?
Animal shapes often flatten during baking if the dough isn't properly proofed. Let your shaped dough rise for the full 30-45 minutes until puffy before baking. For extra support, place a small piece of parchment under delicate parts (like bunny ears) during the second rise.
Also, avoid over-handling—wet hands can cause sticking and weakening of the gluten structure.
Uneven Baking
If your animal breads bake unevenly, rotate the baking sheet halfway through the 12-15 minute bake time. Place the tray on the middle rack for consistent heat exposure. For extra insurance, brush the egg wash only on the top—this prevents steam buildup that can cause soggy bottoms.
If some shapes brown faster than others, cover the darker ones with a small piece of aluminum foil during the last 2-3 minutes of baking.
Dough Not Rising
Cold water or old yeast can kill your dough's rise. Always use water that's 110°F (warm to the touch) and fresh yeast—check the expiration date! If your dough rises slowly, place the bowl in a warm spot like a turned-off oven with the light on, or near a sunny window.
For extra boost, add ½ tsp sugar to the yeast mixture to activate it faster. If it still doesn't rise, your yeast might be dead—start fresh with a new packet.
Cracked Surfaces
Rapid temperature changes or overproofing cause cracks. Let your shaped dough proof at room temperature for 30-45 minutes max—don't let it double completely before baking. For extra protection, score the top of each shape lightly with a sharp knife before baking.
This controlled cut prevents random cracking and gives a more professional finish. Also, avoid opening the oven door during the first 10 minutes of baking to maintain steady heat.
Glaze Not Sticking
If your honey glaze or egg wash won't adhere, your bread might be too cool or the glaze too thin. Brush the wash on just before baking when the oven is fully preheated.
For the honey glaze, mix it with 1 egg yolk and brush it on immediately after baking while the bread is still warm. If the glaze beads up, add ½ tsp water to thin it slightly. For extra grip, chill the baked bread for 5 minutes before glazing.
Nutrition facts
Frequently asked questions
What's the easiest animal shape to make for beginners?
Start with simple shapes like bunny rabbits or hot dog rolls—they require minimal shaping skills. For bunnies, flatten a dough ball into an oval, pinch the bottom for feet, and twist two small pieces for ears. Hot dog rolls just need rolling into logs with a slit cut down the middle. Both hold their shape beautifully during baking!
Can I make these without yeast?
No, yeast is essential for the dough to rise and hold its animal shapes. If you're avoiding yeast, try a savory dough recipe with baking powder instead, but it won't have the same light, airy texture. For a quick alternative, use pre-made dinner rolls—flatten and shape them into animals, then bake as directed.
How do I keep the shapes from sticking to the baking sheet?
Line your baking sheet with parchment paper and dust generously with cornmeal or semolina. This creates a non-stick barrier while adding a nice texture. For extra insurance, chill the shaped dough for 15 minutes before baking—this firms up the surface and prevents spreading. Never skip the parchment!
Can I make these with whole wheat flour?
Yes, but replace half the all-purpose flour with whole wheat for a nuttier flavor. Whole wheat dough is denser and less elastic, so knead for 2-3 minutes longer and let it rise 10-15 minutes extra. The shapes will still hold but may be slightly heavier. For best results, use a 50/50 blend to maintain tenderness.
What if my kids want to help decorate?
Let them go wild with food coloring and toothpicks! Mix a few drops of coloring with a little water in small bowls, then let kids use toothpicks to draw eyes, spots, or stripes on the unbaked shapes. For extra fun, use a piping bag with a small tip to add details like whiskers or horns. Just supervise closely—some colors may stain!